Contents
What is NanoDoc CLI?
NanoDoc CLI converts PDF files and entire folders of PDFs into clean Markdown, together with a companion JSON file of document metadata. It runs locally on Apple silicon Macs and is used from Terminal.
With NanoDoc you can:
- Convert one or many PDFs at once to Markdown, with a JSON metadata file.
- Extract tables as Markdown or HTML inside the Markdown output.
- Run a local web server for document processing and tool integrations.
- Support MCP protocol and custom built Skills for extended capabilities.
Start here
NanoDoc converts a PDF or a folder of PDFs into Markdown and JSON from Terminal. Complete the steps below first; you will finish with parsed files in a local output folder.
Check requirements
NanoDoc CLI requires an Apple silicon Mac running macOS 15 (Sequoia) or later. You also need a PDF to use for the first conversion.
uname -m

sw_vers -productVersion

Continue only when the architecture is arm64 and the macOS version is 15.x or later.
Install and verify
Launch the installer and keep an eye on the terminal logs. NanoDoc will automatically detect the Agent tools installed locally and prompt you whether to replace the corresponding PDF parsing skill.
curl -fsSL https://nanodoc.ai/install.sh | sh
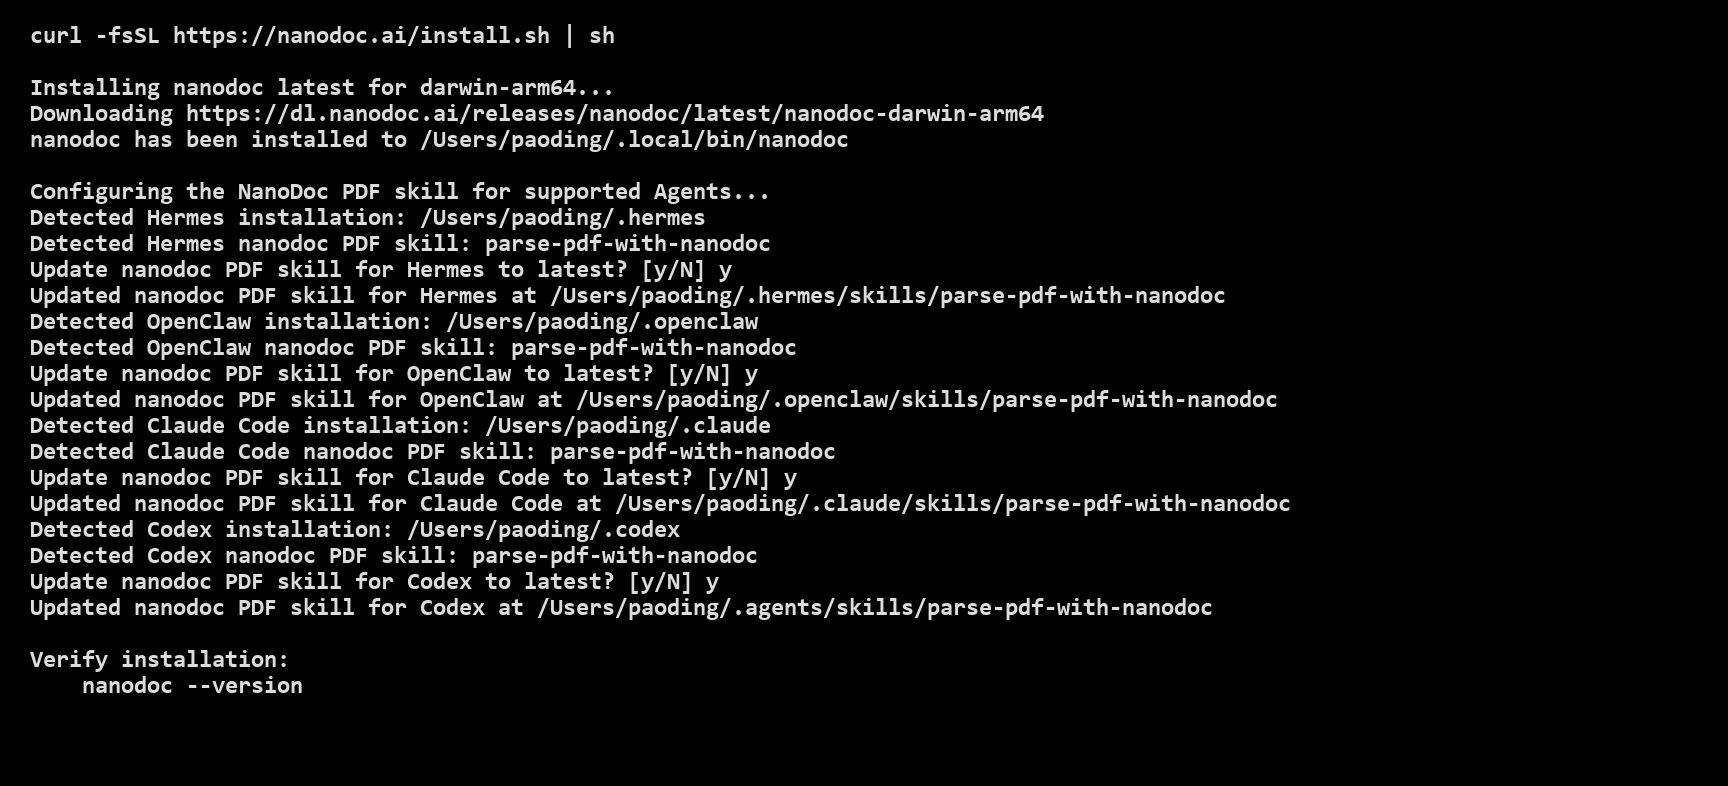
nanodoc --version
A version number means NanoDoc is ready. If the command is not found, open a new Terminal window and run the installation command again.
Sign in with a device code
nanodoc login --device-auth
The terminal prints a URL and a short code.

Open the printed URL, enter the code, and complete sign-in. The CLI returns to the prompt when authentication is complete.

Parse your first PDF
Put a PDF named sample.pdf in the current folder, then run the command below. The --output option is required and must name a folder.
nanodoc ./sample.pdf --output ./output
After parsing finishes, inspect the output folder:
./output/sample/sample.md
./output/sample/sample.json
./output/sample/images/
The Markdown file contains the parsed document, the JSON file contains document metadata, and the images folder contains extracted images. Once these files exist, the basic workflow is complete.
Work with documents
Use the basic command above for ordinary PDFs. Add options only when you need a different table representation or want to process a folder.
Choose a table format
HTML is the default representation for extracted tables. Use Markdown table syntax when the downstream reader expects pipe tables.
| Need | Command |
|---|---|
| Use the default HTML table representation | nanodoc ./sample.pdf --output ./output |
| Write tables as Markdown pipe tables | nanodoc ./sample.pdf --table-format markdown --output ./output |

--table-format changes tables inside the Markdown file. NanoDoc still writes both a Markdown file and a JSON metadata file.
Parse a folder
Pass a folder instead of one PDF to process every PDF inside it.
nanodoc ./my-pdfs --output ./output
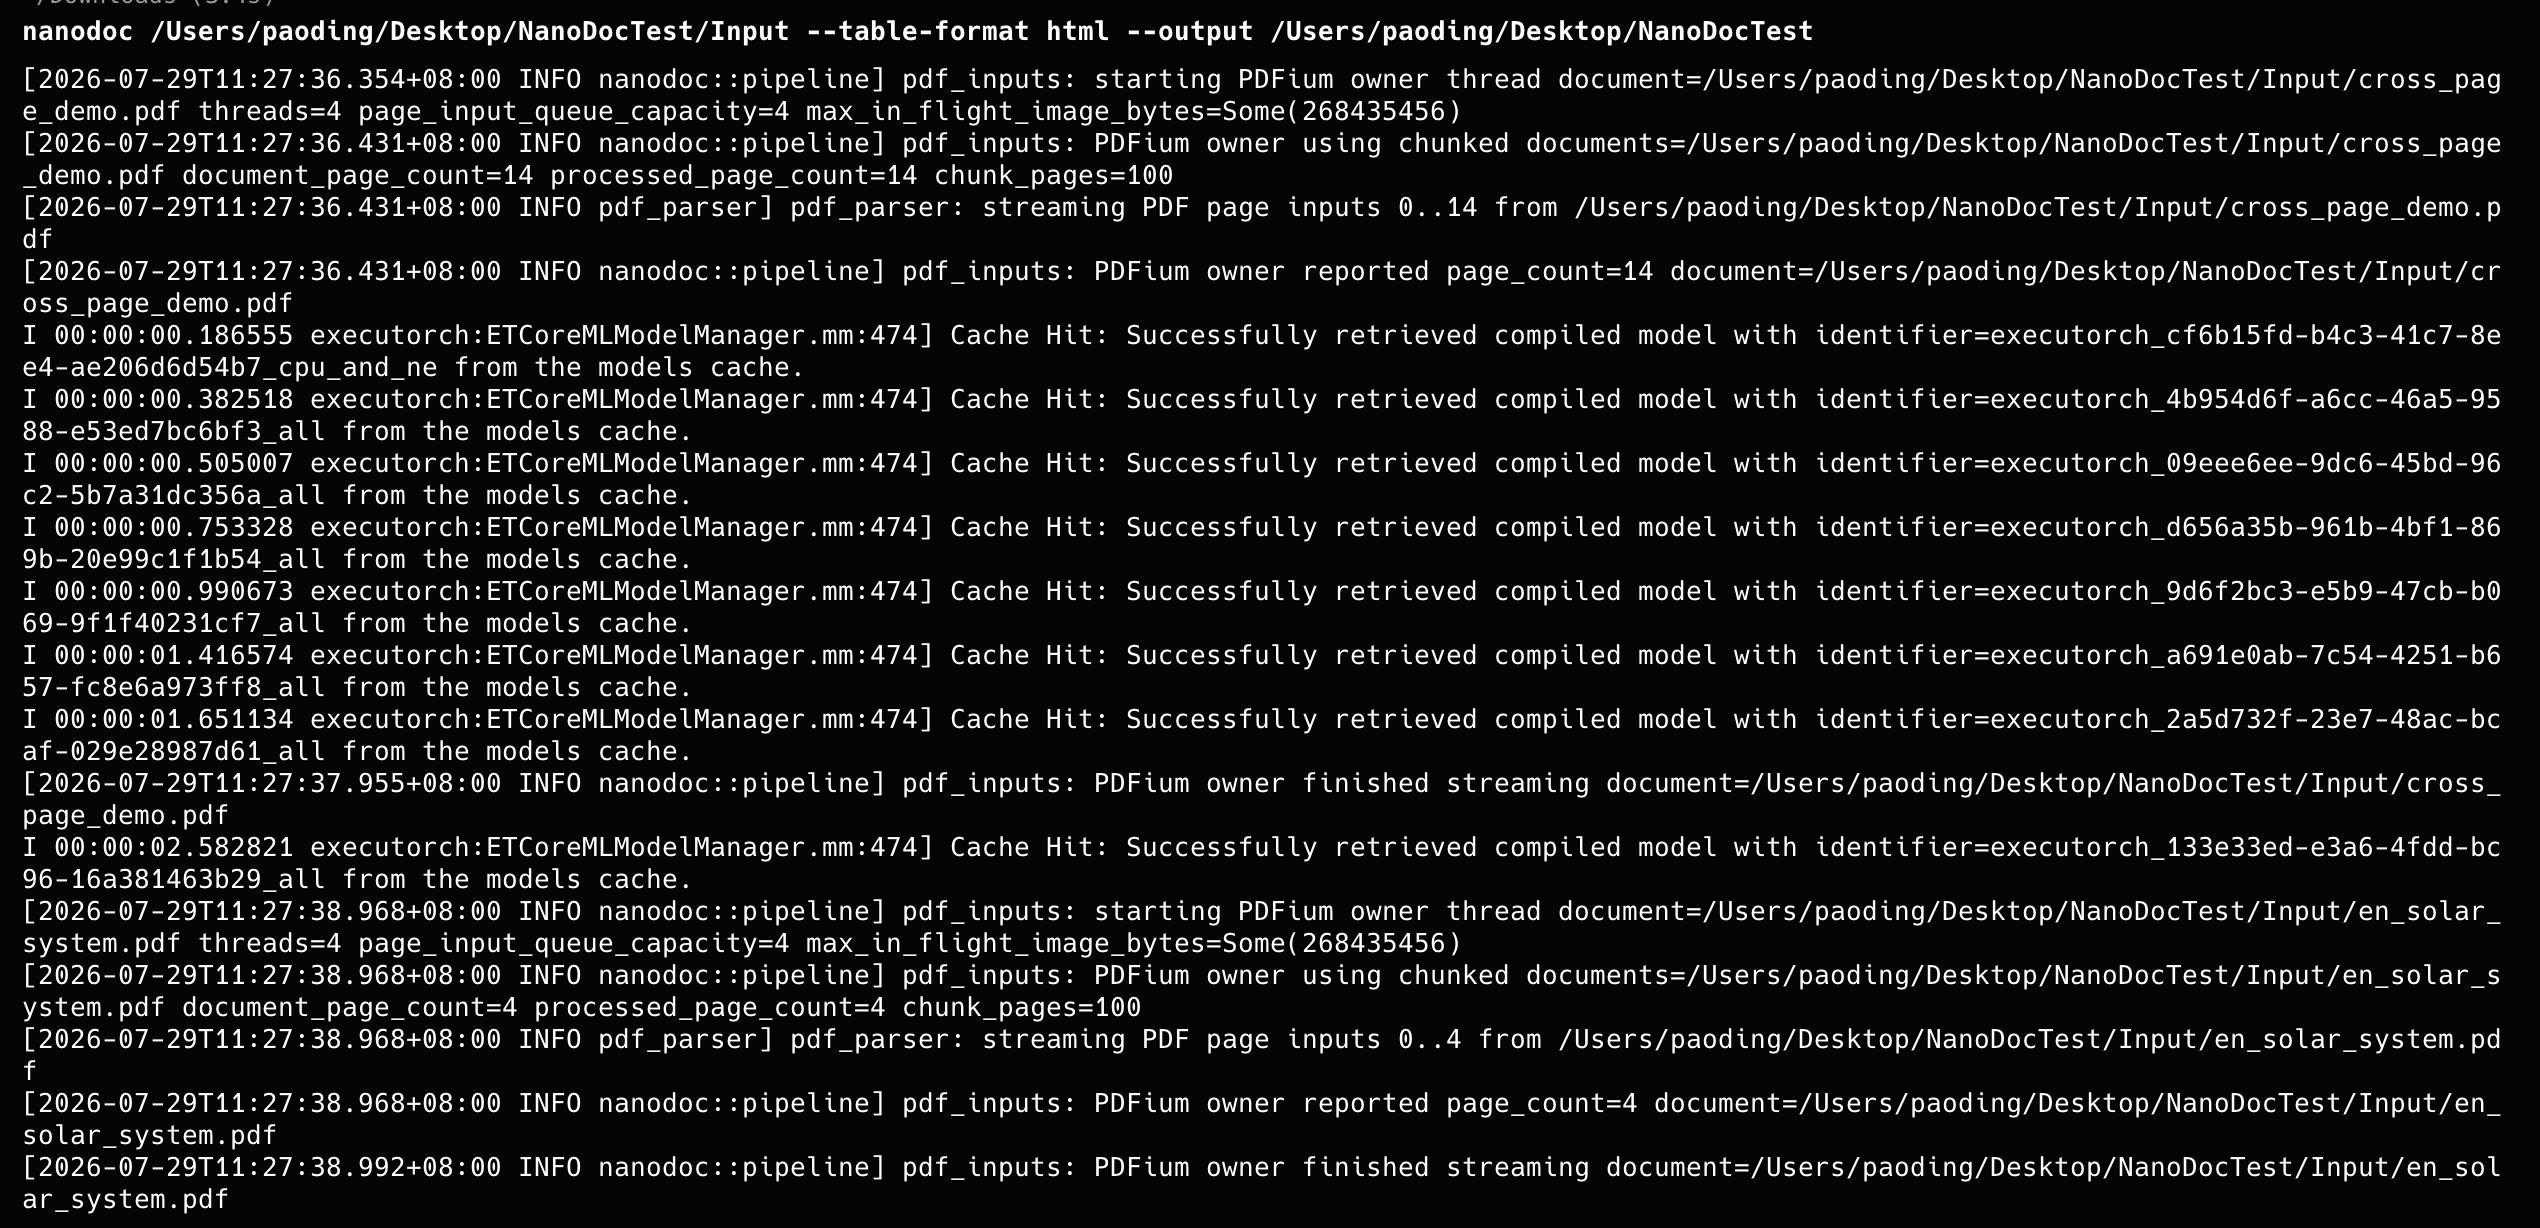
Each input PDF receives its own folder under ./output.
Choose an OCR backend
NanoDoc supports multiple OCR backends. The default is NanoDoc-OCR. Use --ocr-backend to switch models when you need broader language coverage or handwriting support.
nanodoc ./sample.pdf --output ./output --ocr-backend <model>
--ocr-backend only affects text recognition. Layout analysis, table extraction, and output formatting remain the same.
Service Deployment & Agent Integration
NanoDoc can be run as a single-use command-line tool, a persistent background service, or integrated directly into AI Agent workflows.
Start Local Provider Server
The serve command starts a local provider server — a small HTTP service that keeps the PDF engine loaded in memory. Once it is running, later parses reuse the loaded model, which makes repeated conversions much faster. Without serve, each parsing call starts the model from scratch (a cold model load for every conversion). Use serve when you expect to parse a batch of PDFs in one session, or when another local program needs to call NanoDoc through its local API.
nanodoc serve --help
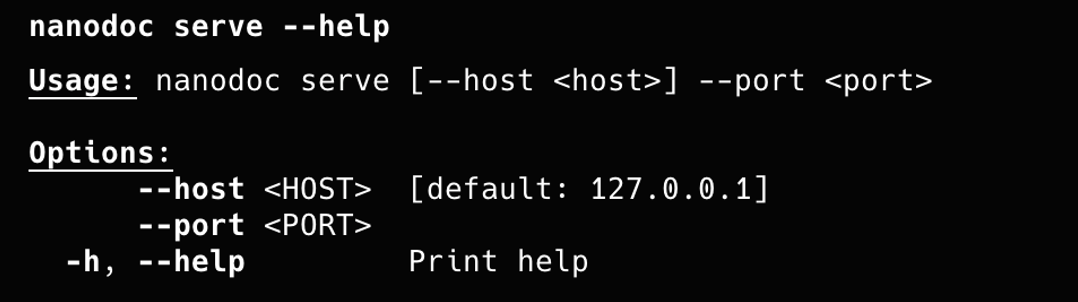
The port is required. Start a local-only server on port 8080 with:
nanodoc serve --port 8080

After the local server starts, use standard parsing commands to process PDFs.
Single PDF:
nanodoc ./sample.pdf --output ./output
Folder:
nanodoc ./my-pdfs --output ./output
The default host is 127.0.0.1. Keep the Terminal window open while the server is in use and press Ctrl+C there to stop it. Change --host only for a trusted network.
Connect NanoDoc to Your Agent
These workflows are separate from normal Terminal or Web UI parsing. You can connect NanoDoc to an agent in two ways.
Skills — Use Skills when you want NanoDoc to replace a supported Agent's built-in PDF-reading skill. NanoDoc is loaded directly into the Agent's runtime, so it runs on the same device with no separate process and no network hop. This is the recommended path when the Agent and NanoDoc run on the same machine.
MCP — Exposes NanoDoc as a callable tool over standard MCP protocols (supports local stdio or remote HTTP/SSE). This covers setups where the Agent and NanoDoc are on different devices.
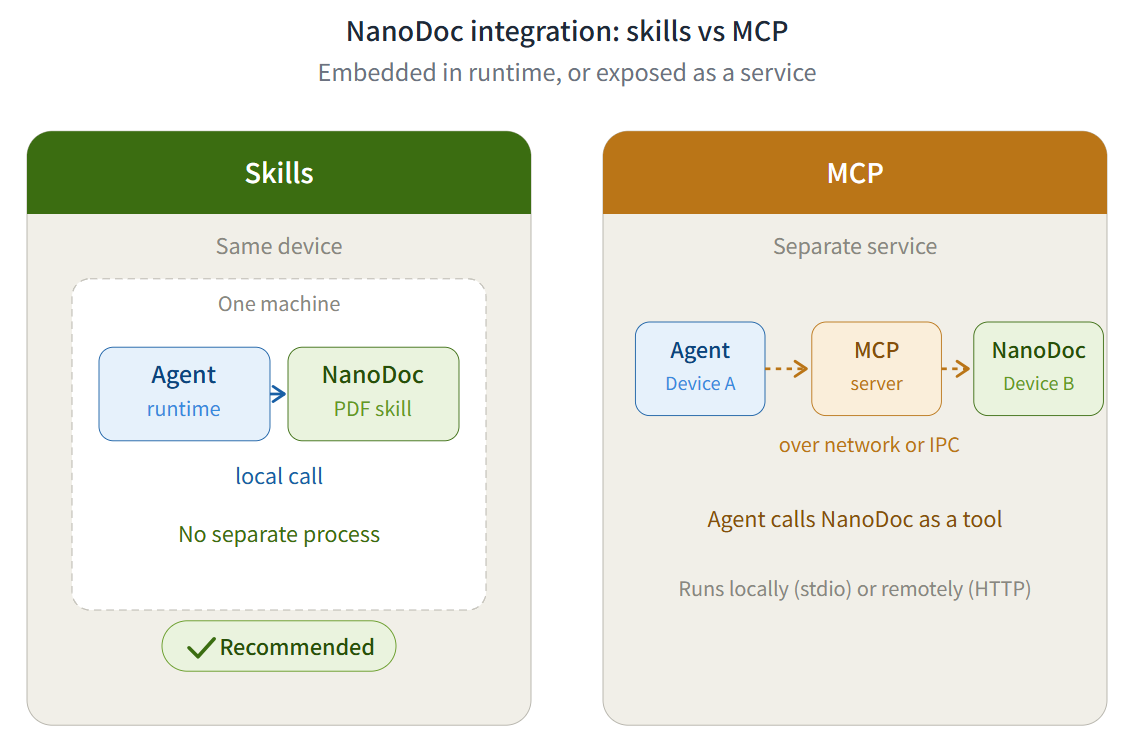
Quick rule: if everything runs on the same machine, prefer Skills. If NanoDoc runs as a separate service or on another machine, use MCP.
Install Agent Skills
NanoDoc can detect and replace the PDF skills used by Claude Code, Codex, Hermes, OpenClaw and WorkBuddy. It injects NanoDoc directly into the Agent's runtime to replace its built-in PDF reading capabilities.
Run the following later when you add a supported agent tool or skip the installer prompt the first time:
nanodoc skills install
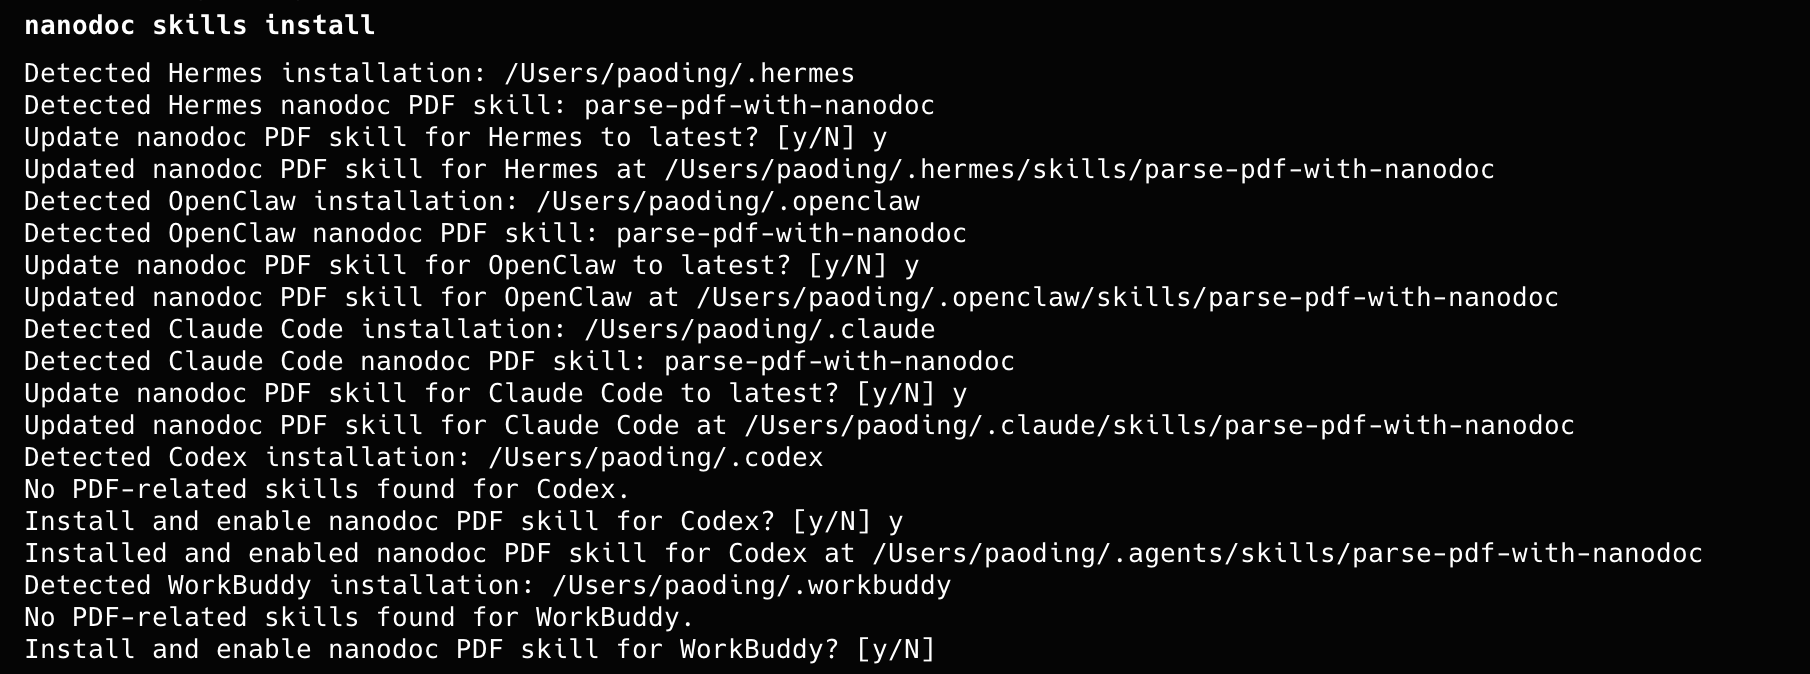
Triggering Skills in Supported Agents:
- Claude Code: Type
/nanodocor let Claude load it automatically from the prompt context. - Codex: Prompt naturally. The NanoDoc Skill can only be used inside Codex Projects. Codex auto-activates the skill according to the matching-rules set in
SKILL.md. Please create or select an existing project before use. - Hermes Agent: Run
hermes skills listto check active skills; auto-matched by Hermes Router. - OpenClaw: Skills located in workspace or global
./skillsdirectories are loaded automatically. - WorkBuddy: Skills placed in the workspace
.workbuddy/skillsdirectory or configured in global Skill settings are loaded automatically. Trigger by directly prompting in chat (auto-matched by intent) or using the explicit command/nanodoc.
For complete usage instructions for the Skills feature, please refer to the official documentation:
- Claude Code: https://code.claude.com/docs/en/skills
- Codex: https://learn.chatgpt.com/docs/customization/overview#skills
- Hermes Agent: https://hermes-agent.nousresearch.com/docs/user-guide/features/skills
- OpenClaw: https://docs.openclaw.ai/tools/skills-config
- WorkBuddy: https://www.workbuddy.ai/docs/workbuddy/From-Beginner-to-Expert-Guide/Function-Description/Skills-Market
Please attempt to restart the Agent tool when Skills fails to work properly.
Run an MCP Server
nanodoc mcp
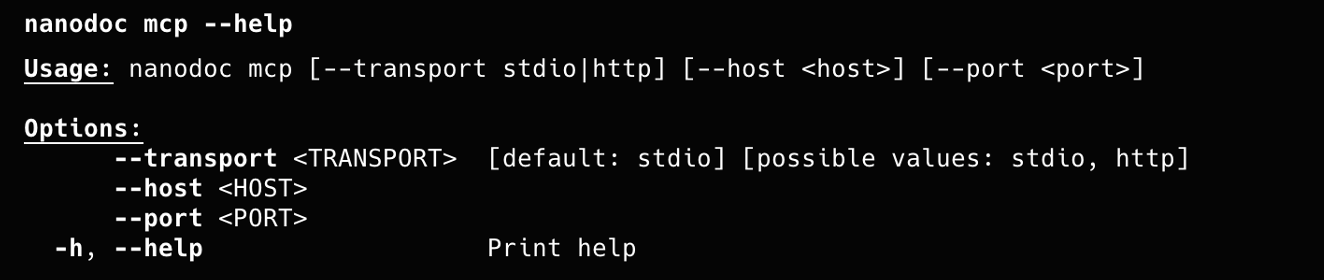
Once the server is running, manage and use it from your target agent tool:
-
Claude Code:
- Run
claude mcp listor type/mcpin your session to check status. - Usage: Prompt naturally without special prefixes (e.g., "Use NanoDoc to extract tables from test.pdf").
- Docs: https://code.claude.com/docs/en/mcp-quickstart
- Run
-
Codex:
- Run
codex mcp listto confirm that the server status is Active. - Usage: Codex automatically detects available tools; prompt it directly in natural language.
- Docs: https://learn.chatgpt.com/docs/customization/overview#mcp
- Run
-
Hermes Agent:
- Run
hermes mcp statusto verify connectivity. - Usage: Send your parsing request in the chat terminal; Hermes will invoke NanoDoc automatically.
- Docs: https://hermes-agent.nousresearch.com/docs/user-guide/features/mcp
- Run
-
OpenClaw:
- Run
openclaw mcp statusor check the Web UI (/settings/mcp). - Usage: Ask questions directly in the OpenClaw agent session.
- Docs: https://docs.openclaw.ai/cli/mcp
- Run
-
WorkBuddy:
- Check Status: Run
workbuddy mcp statusor verify connected servers in the MCP panel. - It is recommended to add
"alwaysLoad": truein the MCP configuration to improve availability. - Usage: Prompt naturally in chat (e.g. "Use nanodoc to extract tables from test.pdf").
- Docs: https://www.workbuddy.ai/docs/workbuddy/From-Beginner-to-Expert-Guide/Function-Description/MCP-Guide
- Check Status: Run
The default transport is stdio. For an HTTP MCP server, use --transport http; its default address is 127.0.0.1:8765. Expose it beyond the local machine only on a trusted network.
Reference and troubleshooting
Commands and options
Use nanodoc --help for the full command line. The most useful commands and parsing options are collected here for day-to-day work.
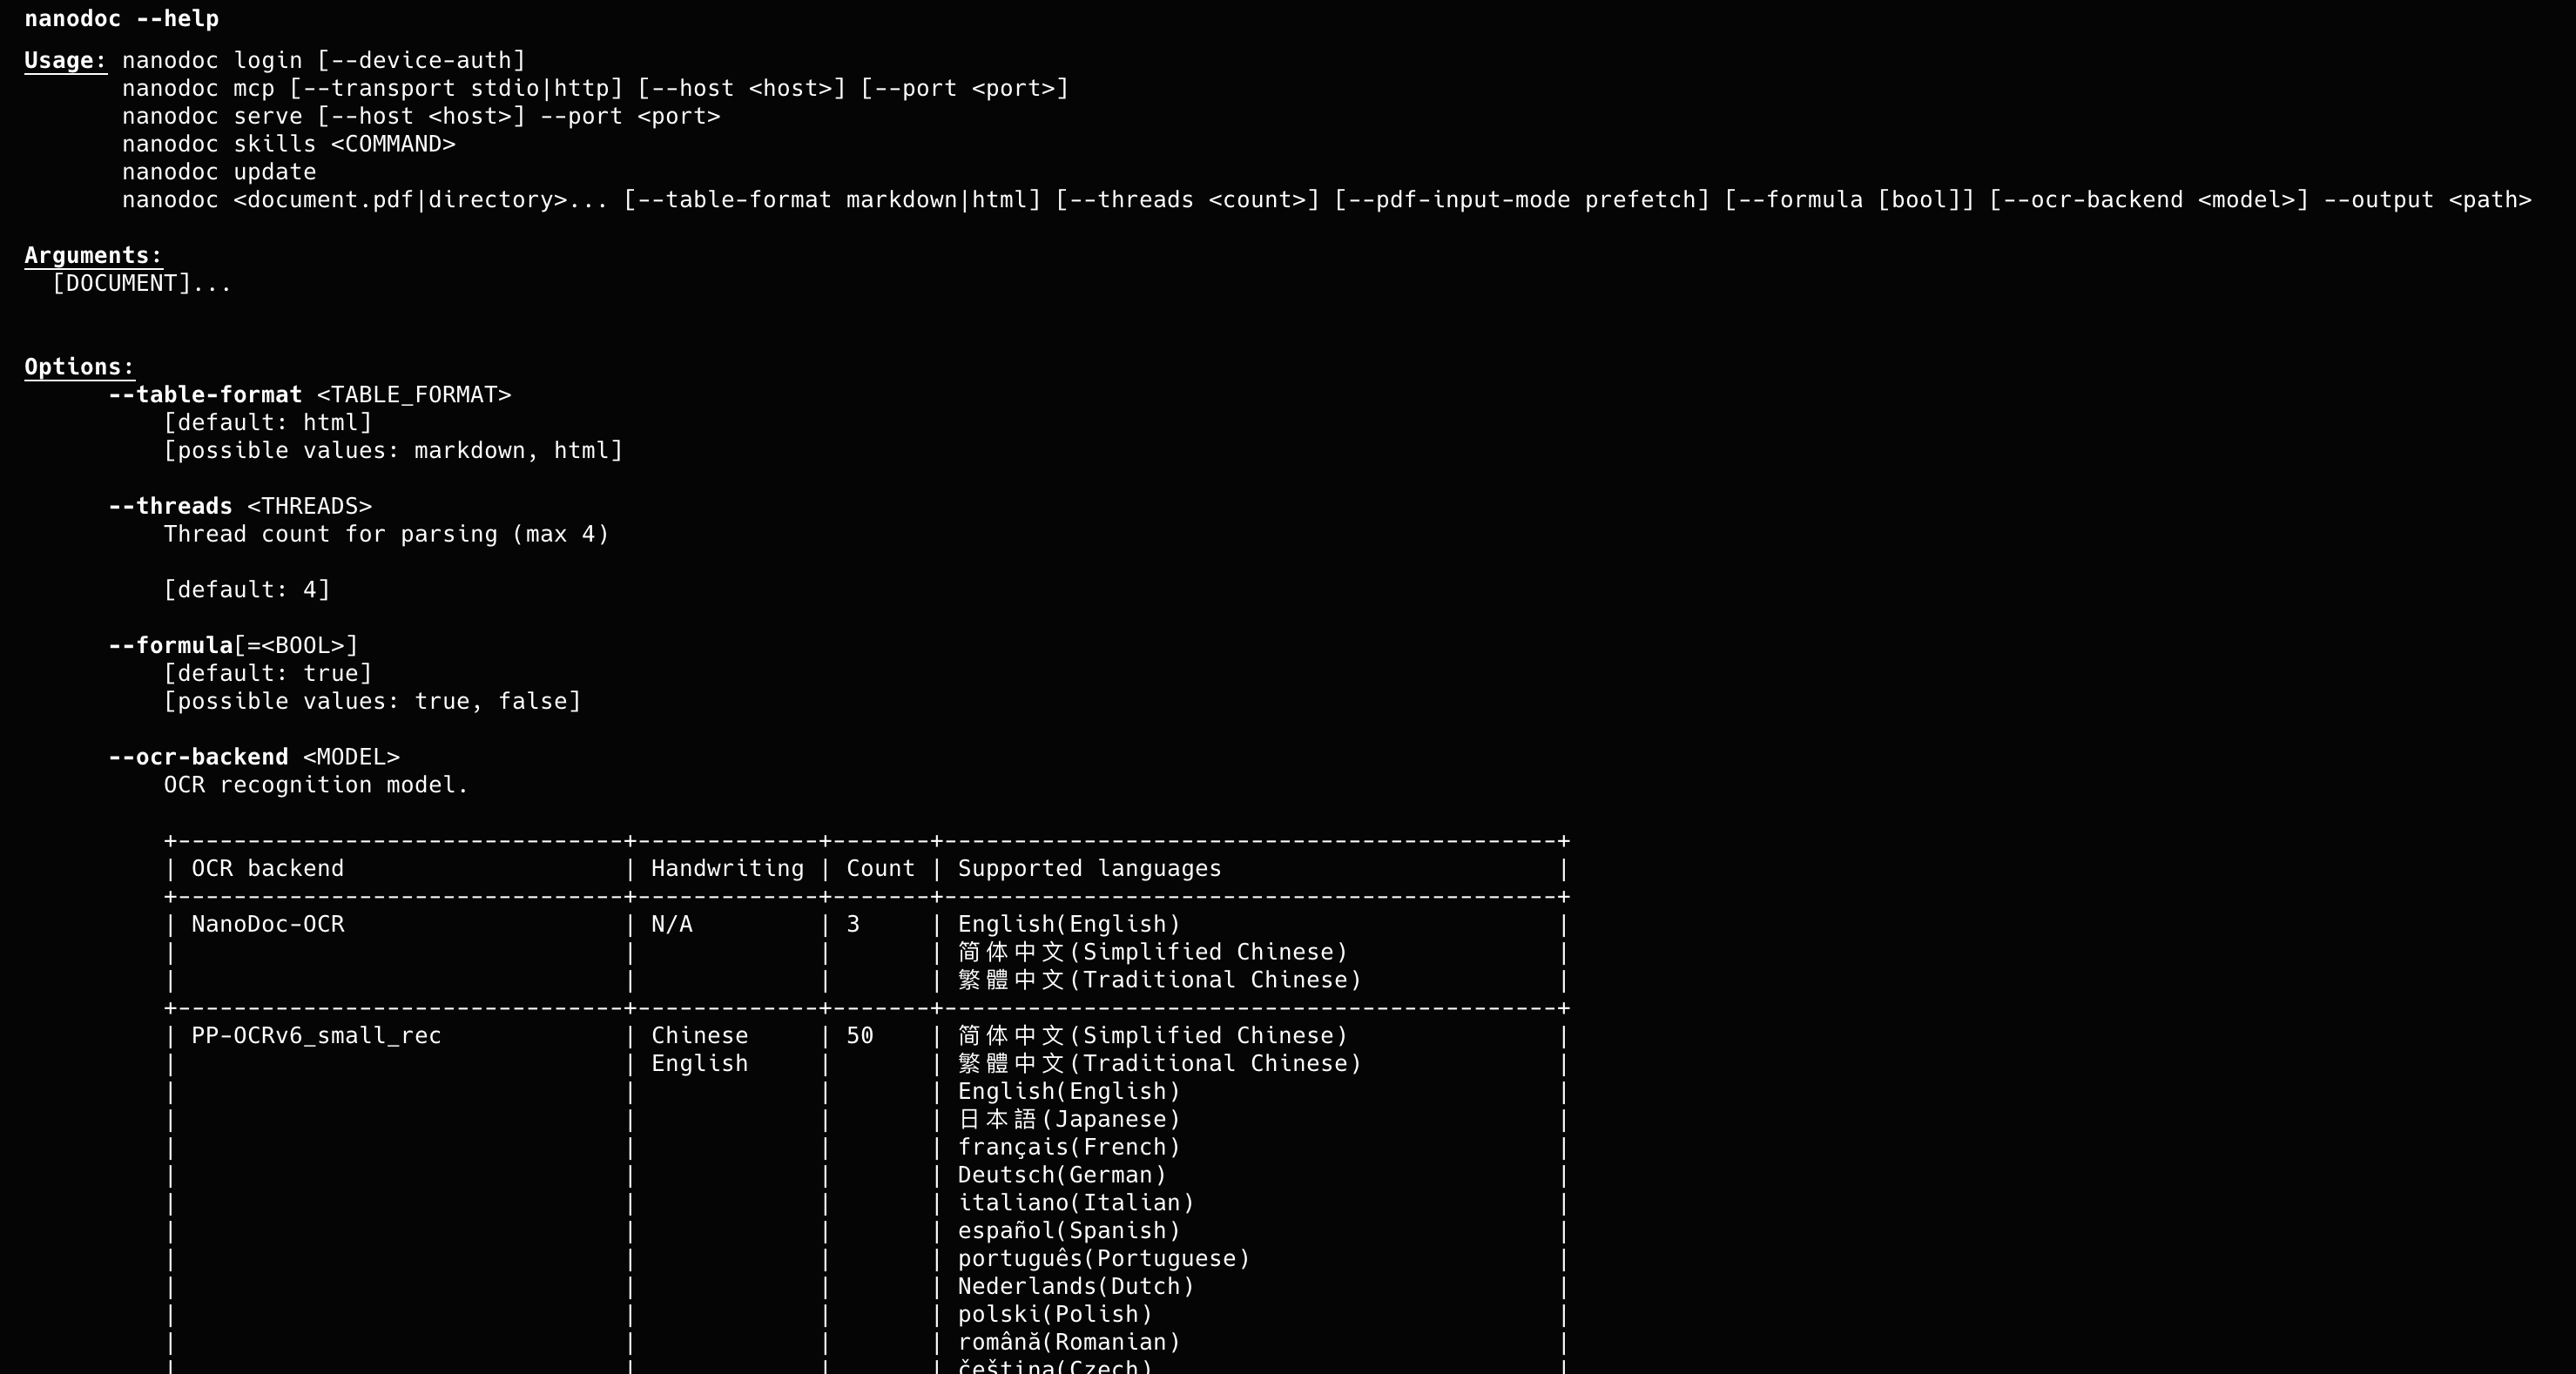
| Command or option | Purpose | Default |
|---|---|---|
nanodoc login [--device-auth] | Perform user login; --device-auth enables device‑code authentication mode. | |
nanodoc <document.pdf|folder> --output <path> | Parse one or more PDF files / whole folder, write result to target path. | --output is required |
--table-format <markdown|html> | Select output table format. | html |
--threads <count> | Parsing worker thread count, maximum value is 4. | 4 |
--formula[=<true|false>] | Toggle mathematical formula extraction. | true |
--ocr-backend <model> | Select OCR recognition model. | NanoDoc-OCR |
nanodoc serve [--host <host>] --port <port> | Launch local HTTP service, port argument is required. | Host: 127.0.0.1 |
nanodoc mcp [--transport stdio|http] [--host <host>] [--port <port>] | Start MCP server, choose transport type, bind host and port. | |
nanodoc skills <COMMAND> | Execute nanodoc skills sub-commands. | |
nanodoc update | Upgrade nanodoc to latest version. | |
--help | Show CLI help message. | |
--version | Print current program version. |
Update NanoDoc
nanodoc update

nanodoc --version
Check the version after the updater completes.
Troubleshooting
| What you see | What to do |
|---|---|
nanodoc: command not found | Open a new Terminal window, then run the installer again. |
| No output after parsing | Confirm the input path exists and that --output names a folder. |
| Server cannot start | Choose an unused value for --port and keep --host on 127.0.0.1 unless network access is intentional. |
Warning: nanodoc login succeeded but license activation failed | Visit https://nanodoc.ai/nanodoc/#/plans to renew or upgrade your subscription, then run nanodoc login again. |
| Need another option | Run nanodoc --help. |